Author: Jeron Wong

  • The Civilian G36 Saga: Trials and Tribulations

    The Civilian G36 Saga: Trials and Tribulations

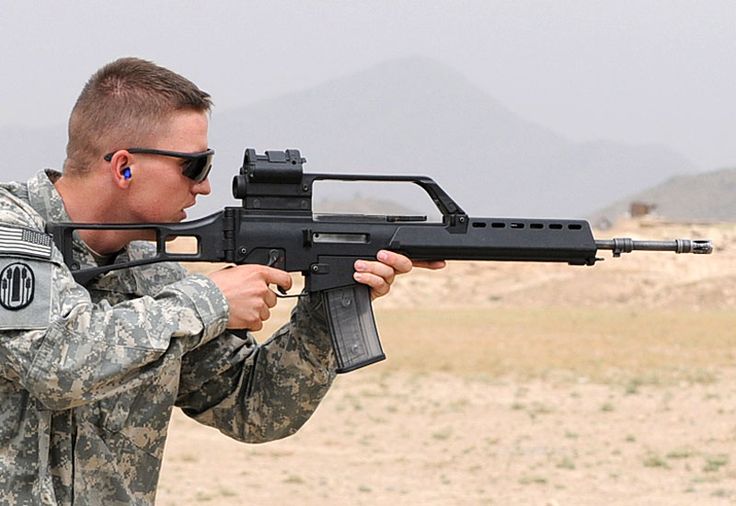
    The story of bringing the HK G36 to American hands is one of adaptation, regulation, and determination. From factory-neutered versions to innovative conversions, let’s dive deep into the history of how enthusiasts have pursued this iconic German rifle design.

    The “Forgotten” SL8

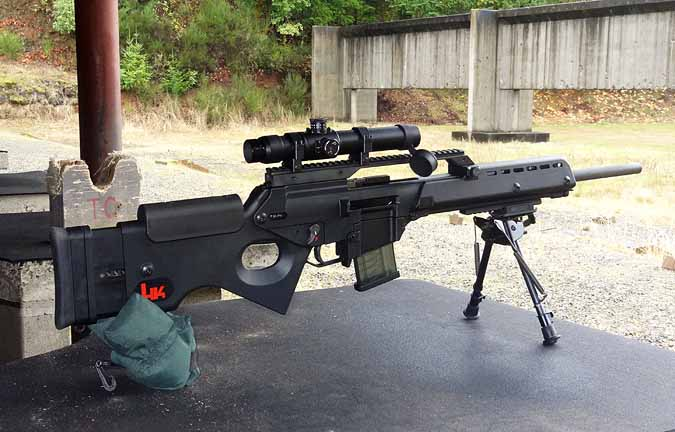
    Heckler & Koch’s first attempt at a civilian G36 came in the form of the SL8, produced from 1998 to 2011. While it maintained the core rotating bolt system similar to the AR-18, the rifle was heavily modified to comply with various gun control measures. Gone was the characteristic pistol grip and folding stock, replaced with a fixed thumbhole stock. The magazine capacity was restricted to 10 rounds, a far cry from the military G36’s standard 30-round magazines (but hilariously makes it CA compliant). These compromises, driven by the Gun Control Act of 1968 and subsequent regulations, ultimately led to the SL8’s poor sales and eventual discontinuation.

    Enter Tommybuilt Tactical

    As factory options disappeared, the firearms community found a champion in Tommybuilt Tactical. They two paths for G36 enthusiasts: complete SL8 conversions to G36 configuration, or the option to purchase the entire T36 rifle. The T36 allowed enthusiasts to skip the arduous and expensive process of converting an SL8, while still achieving the iconic G36 look and feel. Forum discussions reveal that while SL8 conversions with German parts were considered the gold standard, they became increasingly difficult as G36 parts kits grew scarce.

    The T36 to TG36 Evolution

    In early 2021, the firearms community was shaken when the ATF reclassified the T36 receiver as a machine gun, citing concerns about potential full-auto conversion. Rather than abandon the platform, Tommybuilt Tactical worked to develop an upgraded design. The result was the TG36, featuring additional blocking features to prevent conversion. In a note to T36 owners from Tommybuilt Tactical:

    The ATF has made it clear that if your T36 is not returned for upgrade to the TG36, it will be considered contraband and subject to seizure.

    Once seized you will lose your entire T36 assembly. The resolution that we are offering will allow you to keep ALL of your components in an upgraded state at a minimal cost.

    While existing T36 owners had to pay $225 for mandatory upgrades, this solution allowed them to keep their investments legally functional.

    The TG36 Experience

    Recent user experiences with the TG36 reveal both its appeal and challenges. While praised for capturing the G36’s essence, some users report needed tweaks for reliable operation. Common adjustments include smoothing out polymer flashing, polishing feed ramps, and fine-tuning the bolt catch. However, owners consistently praise Tommybuilt’s customer service and willingness to address issues, even if some gunsmithing knowledge proves helpful.

    The civilian G36 story exemplifies how regulation and innovation shape the American firearms market. While the original SL8 may have disappointed, the community’s determination and companies like Tommybuilt Tactical have kept the G36 dream alive, even if the path hasn’t always been smooth. However, there is hope:

    Q: Are the G36 and the MP7 (US civilian offerings) Coming?
    A: We have worked with ATF as well as the German authorities for a path forward. We consider these active (in progress) programs. It is likely that these will be released after 2025. We will not comment on these in-process programs again until we are closer to launch.

    In a message from the CEO of HKUSA, we may have news by next year if there will be a US launch of these beloved firearms!

  • Mastering Iron Sights with the Nose-to-Charging Handle Technique

    Mastering Iron Sights with the Nose-to-Charging Handle Technique

    When it comes to shooting iron sights on AR-15 or M16 rifles, achieving consistency is key. Henry Chan from 9 Hole Reviews in a segment shared on MidwayUSA, highlights an effective technique called the nose-to-charging handle method. This approach ensures that your eyes align in the same position every time you aim, providing a consistent and reliable reference point.

    The nose-to-charging handle technique involves positioning the tip of your nose directly on the charging handle. While it might seem unconventional, this method is particularly useful for M16A2 or AR-15 rifles with traditional A2-style iron sights. By keeping your nose close to the charging handle, your eyes naturally align with the front and rear sights, improving accuracy, especially in dynamic or quick-action scenarios.

    Henry mentions that this technique originates from his military training, which he has adapted into his civilian shooting practices. He emphasizes that while this method is ideal for iron sights, it may not be as applicable for rifles equipped with optics.

    For shooters looking to enhance their precision and maintain consistent aim, the nose-to-charging handle technique is a proven tool. It’s simple yet effective and can be especially helpful for those using rifles with fixed iron sights.

    Special thanks to Henry Chan of 9 Hole Reviews for sharing this insightful tip. We here at Gunkata.blog are huge fans, and if you’re interested in more expert shooting techniques, check out Henry’s work on the 9 Hole Reviews channel!

  • Building an AR-15 in California in 4 Easy Steps

    Building an AR-15 in California in 4 Easy Steps

    Building your own AR-15 is a rewarding experience that allows you to customize your rifle. This approach is the easiest for beginners because the complete upper comes pre-assembled, removing the most technical part of the build. Additionally, it allows you to source parts that are compatible and California-compliant. By purchasing a stripped lower and a rifle kit, you’re also going to get better parts than pre-built rifles such as the S&W MP Sport, while gaining the satisfaction of building your own. In this post, I’ll walk you through the easiest way to build one, focusing on the stripped lower and rifle kit approach.

    This method is beginner-friendly and minimizes the need for specialized tools or advanced skills.

    Step 1: Purchase a Stripped Lower Receiver

    The stripped lower receiver is the only serialized part of the AR-15 and must be purchased through an FFL dealer in California, which include big box stores like Bass Pro, Turner’s, or Sportsman’s Warehouse.

    Anderson Stripped Lower. It’s cute how it looks like packaged candy

    Popular brands for stripped lowers include Aero Precision or Anderson Manufacturing. Be prepared to pass a background check and follow the 10-day waiting period required in California.

    Step 2: Order a Rifle Kit

    A rifle kit typically includes all the remaining parts you need to complete your AR-15, such as a complete upper receiver (already assembled), a lower parts kit (trigger, safety, etc.), and the buffer tube, buffer spring, and stock. This approach saves you the effort of assembling the upper receiver and ensures all parts are compatible.

    Brands like PSA and Del-Ton offer excellent as well as affordable options for beginners.

    Step 3: Assemble the Lower Receiver

    Here’s where you’ll do most of the work. Thankfully, assembling the lower receiver is straightforward with the right tools and a good tutorial.

    Tools Required:

    1. Punch Set – For driving in roll pins.
    2. Small Hammer – To assist with pin installation.
    3. Armorers Wrench – For the buffer tube assembly.
    4. Needle-Nose Pliers – To handle small springs and detents.
    5. Flathead Screwdriver – For specific screws in the lower parts kit.
    6. Bench Vise (Optional) – To stabilize the lower while working.
    7. Roll Pin Holder/Starter Set (Optional) – To make roll pin installation easier.
    8. Blue Loctite (Optional) – For securing screws and threads.

    There’s a million and one online tutorials for assembling the lower receiver. I recommend checking out this guide from Pew Pew Tactical as it’s thorough and well written. It also shows what a CA compliant AR-15 would look like as well, with the featureless grip.

    Step 4: Attach the Complete Upper Receiver and Function Test

    Attaching the upper receiver to the lower receiver is straightforward. Join the two receivers using the included takedown pins. Since the upper receiver comes pre-assembled, there’s no need to worry about headspacing or gas system adjustments. If you opted for a fixed-magazine lower, install the appropriate mechanism before joining the receivers. For a featureless build, ensure your grip, stock, and muzzle device comply with California law.

    Perform a safety check to ensure the firearm is functioning correctly. Test the trigger reset, verify the safety selector works, and cycle the charging handle. Once these steps are complete, head to a range to test-fire your rifle and make any necessary adjustments, such as sighting in your optics or iron sights.

    Building an AR-15 can seem hard at first, but with these 4 steps, you’ll be enjoying your own AR-15 in no time!

    Disclaimer: This guide is for informational purposes only. Always consult local laws and regulations before building a firearm.